However, it is not the increase in surface area that causes the increase in friction as the surfaces wear, because friction is independent of the area upon which a force is acting. The friction is dependent upon the magnitude of the force acting on the pivot, (pushing it to the right), and the yield pressure of the metals, a measure of the force the metal particle irregularities in a unit area of surface can support before being crushed down. So, all else being equal, the friction taking place in the new bushing is the same as the friction taking place in a worn bushing that has been cleaned, (contrary to most people's expectations), unless the surfaces have become rough. Now think about the foreign particle becoming embedded in the brass that scratches the pivot, as described in the rough bushing test. The rougher pivot scratches the brass. The result is further contamination of the oil in the bushing, which turns from a slick liquid to an abrasive paste of foreign particles, brass and steel powders,
with a texture similar to toothpaste. In the new bushing, the hole is larger than the pivot. There is room for the paste to be pushed out of the way. In a badly worn bushing, the hole the pivot has dug for itself is now effectively the same size as the pivot diameter. The paste is thicker than the oil was because of the contaminating particles in it. Since the pivot and the worn portion of the bushing hole are the same size, the paste causes binding. Now consider the same scenario with a dry bushing, or without
enough oil to form a paste. If both the pivot and hole surfaces are rough, the roughness could cause a small shift to one side, (much the same way the front tire of a bicycle shifts to one side a little when it rides over a pebble). If this shift pulls the pivot shoulder against the brass plate, a considerable increase in friction or even binding could occur. This would sometimes happen and sometimes not, making its behavior appear to be random. The broach test is also simple, once the
logic behind it is understood. Put a cutting broach into the bushing hole to be tested. Turning with a FEATHER-LIGHT TOUCH, determine whether there is any binding of the broach.
 |
If the hole is anything but perfectly round, the broach will get stuck in the hole and your feather-light grip will slip. I emphasize feather-light touch because if slightly too much force is used, the broach will cut right through the imperfection in the hole and the latter would not be noticed. Also, too much force can result in too much brass being cut, so a bushing would have to be installed. If the broach gets stuck and your fingers slip, the bushing needs to be investigated further. If the broach does not get stuck, then only a minimal amount of brass, maybe 0.02 mm. thick, would be removed. This would expose a fresh, uncontaminated layer of brass, thus serving to recondition the bushing.
When is a hole too big? Mr. De Carle said: "When the hole has worn to say 25% larger than its original size", (just where are my calipers?), "or has worn oval," (broach test !), "then it should be rebushed." Yes, this decision is clearly a judgment call. There are several variables to consider:
- the precision of the clock. e.g. Vienna regulator v. American two-spring.
- the thickness of the plates. This affects the pivot's angle of side-shake.
- the direction of force. Does the bushing wear towards the pinion of the next gear?
- the depthing of the gear with the next pinion.
Mr. De Carle suggested that the side-shake angle should be about 4� from side to side. This is a good rule of thumb. Many clock manufacturers have taken pride in drilling their bushings with such precision that there is almost no side-shake at all. I believe this is erroneous. The bushing on one side wears to one side and the clock stops long before that bushing stops it. Why? The bushing in the other plate is so tight, (no side-shake), that the other pivot binds
in the other, unworn bushing. Therefore, the broach test sometimes opens a hole that is too tight to yield an appropriate side-shake angle. In addition, the broach test can open an only slightly worn bushing and still have a better result for two reasons. First, the best techniques for installing a replacement bushing in the shop are no match for the precision of the manufacturer's bushing. There is the risk of the installed bushing being off-center or not going in exactly straight. The
clock repairer compensates for this by opening up the hole to yield a side-shake angle bigger than the factory had done. Failure to create adequate side-shake may seem better at first, but if the plates shift or bend for any reason, such as when power is applied to the mainsprings, the clock would have to be taken apart again. Second, the quality of the brass used in the replacement bushings is often inferior to the that of the original.
A few words of caution, however. An increase in side-shake can have other consequences to the functioning of the clock. The depthing of the gears and pinions need to be checked for possible problems: if an increase in side-shake results in the depthing being too shallow, the gear would exert a repelling action upon the pinion, which would result in an increase in friction and wear in the bushings, and also in unwanted friction and wear in the pinion and gear teeth. Also
check the depth of engagement of the strike gathering pallet and rack; check the action of the escape wheel and pallets; and pay close attention to the depth of the fourth wheel with the governor pinion in the chime and strike trains. It may be necessary to replace that bushing after all. The design of the clock may not allow the repairer to have the pivot side-shake he wants: it may be necessary to have a tighter bushing. The ability to decide what constitutes the appropriate repair is what makes clock repair a craft and an art.
EXCEPTION:
If the pivot is shorter than the bushing hole, it may wear inside the bushing but otherwise appear to be in good condition because the bushing looks round. It may also pass the broach test, even if the broach is inserted from the inside of the plate. Careful attention must be paid to bushings with short pivots in them as they can be deceiving. When servicing a clock with short pivots, the length of the bushing must be adjusted to that of the pivot by using a cutting wheel chamfering tool. When a short pivot wears into the bushing, it pushes the pivot out so that the shoulder of the pivot at the other end of the arbor is pressed against the bushing of the other plate, causing binding.
Bushings larger than 2.0 mm are harder to diagnose for wear using the broach test method because the broach is increasingly more difficult to turn lightly, thus reducing the ability to feel for binding. If you remove a small layer of brass and inspect the inside surface in a bright light, the worn area will be darker than the area cut by the broach because the worn area will not have been cut. This visual inspection is difficult to do with small bushings.
BUSHING MANIA.
There are a few clock repairers who would render the broach theory redundant by replacing every single bushing in the clock. I would agree that the end result is similar. This approach also makes some sense, because it only takes a few minutes to replace a friction bushing, whereas it takes considerably longer to take the clock apart a second time. So, if there is any doubt, go ahead and replace that bushing. However, when repairing a higher grade clock, it is
preferable to keep the clock as original as possible. This is where the broach theory would be useful.
WATCH OUT!
I have successfully used the broach technique in the repair of several 18 and 16 size American Waltham and Elgin low grade (7j) pocket-watches to determine whether the installation of a jewel would be necessary. It appears that, the smaller the bushing hole, the better the broach technique works.
PIVOTS:
When overhauling a clock, you know that the wear in the bushing may not always be visible, so you use a broach to 'see' with your fingers. You might also inspect pivots with a loupe and you might feel the pivots with your finger nails. This method is not fool-proof for diagnosing pivots because a pivot may have a deceiving mirror finish but a small burr that might be missed by the eye or the finger nail. Mass-produced clocks have another problem: the pivots may have very smooth surfaces in the middle, but the outermost edge may be rough, which could cause problems. In short, the best way to deal with pivots is to polish all of them just in case. The smooth pivots should be just touched up to be sure. It only takes a minute, and this dramatically reduces the risk of a come-back.
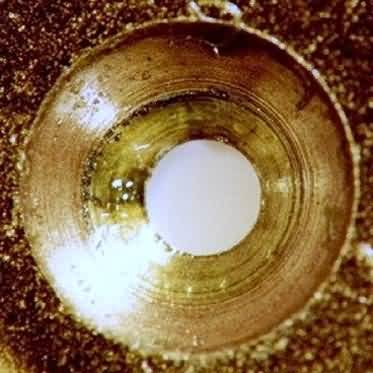
Below is a typically lightly-worn pivot. This photo shows much more detail than you are likely to see with your loupe at the bench, even with a 10x loupe. It would probably look alright and also pass the finger-nail test if the clockmaker were not paying particularly close attention. This photo also shows that the unworn part of the pivot does not have a perfect mirror finish, as is typical of mass-produced clocks.
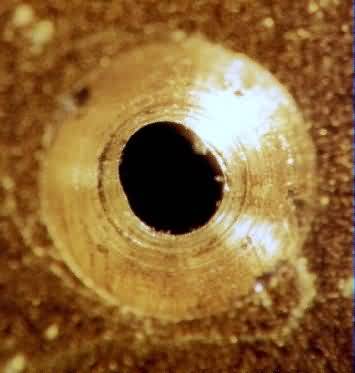
This kind of wear is obvious to the eye, even without a loupe. The cause is rust: once oxidation begins, particles of rust float in the lubricant, acting as an abrasive and causing scoring of the pivot when the rust becomes embedded in the brass bushing surface.
The pivot would have a considerably smaller diameter after polishing, so the bushing would need to be replaced with a bushing that has a smaller hole.
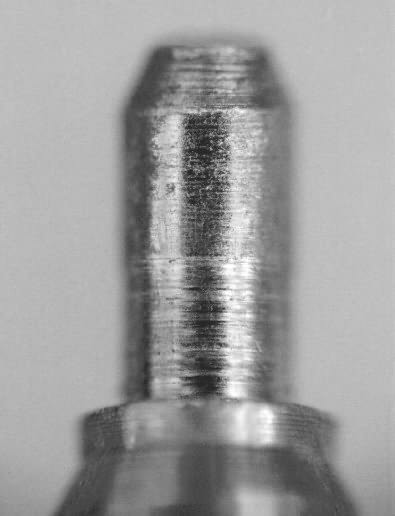
Pivots that are coated with an alloy (for better finish, lower friction and protection from rust) work very well until the lubricant fails.
Once the lubricant fails, if the torque acting on the pivot exceeds the yield pressure of the alloy on the pivot, then the alloy will begin to "flake off" to leave small pits in the surface, which becomes very abrasive and causes the brass bushing to wear at an accelerated rate. This problem with the alloy is common is very common among mass-produced German clocks made since about 1970. The failure of the alloy happens on the second wheel pivots (the gear next to the mainspring barrel), but not on other pivots that have lower levels of torque acting on them. I recommend the thickest grease with graphite and molybdenum disulphide to lubricate these bushings prior to assembly, after repairs are done. This photo shows that the pivot is likely to have once had a near-perfect mirror finish because of the alloy coating.
Go to More Bushings
Clock Repair Main Page
Escapements in Motion
Links Page