21: Daniel's Independent
Double-Escape Wheel Escapement
This escapement brings together the best of the Chronometer and the Swiss Lever.
The Swiss Lever is essentially self-starting. The Chronometer is more efficient and its
escape wheel is not lubricated. The combination is the best of both worlds.
Take the Chronometer's escape wheel, duplicate it, flip it over (to create a mirror
image of it), and place it next to the other with a gap of half an inch. Draw a horizontal
line, rotate it by 45ş, and place it over the center of each escape wheel. Rotate it by 90ş,
and place it over the center of each escape wheel.
 |
You need to find the radius of the impulse pallet's circle (X), as for the
Chronometer. If the escape wheel rotates 18ş (24ş less 3ş twice for drop) during impulse,
you could draw the following triangles:
 |
This calculation is similar to the one on page 68. It could also be calculated using a
different method, and one formula:
Draw a circle with a radius of 1.699 inches and place its center on the point where lines
(1) and (2) intersect.
Draw a horizontal line, (3), through the impulse pallet's circle center. Rotate line (3)
counterclockwise by 31ş (to the point where the pallet circle and the escape wheel's circle
meet) to get line (4). Rotate line (3) clockwise by 31ş to get line (6). In order for the
pallet to be inside the escape circle path, rotate line (4) counterclockwise by 3ş to get line
(5), and rotate line (6) clockwise by 3ş to get line (7). This way the pallets would rotate
by 3ş inside the path of the escape wheel at the moment when the escape wheel is
released.
 |
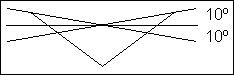
The upper locking pallet should have a width equal to the gap between the escape
wheels and should have a "V" shape to allow for a draw angle of 10ş. Place the pallet 7ş above the horizontal line, shown by the point where lines (8) and (9) intersect.
 |
The lower locking pallets have flat locking faces, however. Rotate the left escape
wheel counterclockwise by 4ş and place one lower locking pallet next to the escape
tooth, below the pallet's circle center, giving the pallet 1ş of lock and a draw angle of
8ş. Rotate the right escape wheel clockwise by 4ş and place the other lower locking
pallet next to the escape tooth, as shown below, giving the pallet 1ş of lock and a
draw angle of 8ş.
 |
Notice that the sum of 10ş for upper draw and 8ş for lower draw
gives 18ş for total draw: this is similar, if only slightly more than the 15ş for draw
designed into the Swiss Lever pallets.
 |
The locking pallets must be placed into position before you could locate their circle
center. The upper locking pallet lies 7ş above the horizontal line. The lower locking
pallets each lie 38ş below the horizontal line, so there are 45ş between the upper and
lower pallets. Place the locking pallet's circle center 16ş below the horizontal line, as
shown by the point where lines (10) and (11) intersect. The axis of rotation is important
because the displacement of each pallet should be the same during rotation.
 |
Before drawing the roller jewel that moves the locking pallets from side to side, you
need to find the distance from the roller jewel's circle center to the locking pallets' circle
center. I will call this distance "D."
|
D = L + 3.25 |
 |
 |
|
R will be the roller jewel's circle radius. |
Draw the roller jewel's circle with a radius of 0.402 inches, and place it such that its
center lies on the center of the impulse pallet's circle. Draw the pallet fork with a radius
of 3.839 inches from the locking pallets' circle center to the entrance corner of the fork
horn: the roller jewel would have a depth of 0.06 inches inside the pallet fork. I have not
included the locking pallets' circle in this drawing, but it would be needed for a
simulation.
 |
In this drawing, I have rotated the locking pallets clockwise by 3ş and the impulse
pallet / roller table assembly counterclockwise by 30ş. The left escape wheel has just
been released by the impulse pallet and is detained by a lower locking pallet. The right
escape wheel is detained by the upper locking pallet.
 |
This drawing reveals how complicated the design is. Notice
how the escape wheel and the impulse pallet appear to roll together, instead of sliding
across one another, and therefore why the escape wheels and the pallets need not be
lubricated.
There are several differences between my drawing and the original specifications. I
made these changes in order to enhance the actions of the escapement during the
simulation. The gap between the escape wheels was not drawn in proportion to the
original, but the only effects this had were to change the impulse pallet's circle radius and
the diameter of the upper locking pallet. The convenience of using the gap of half an
inch, in allowing me to use the "snap to grid" function in the computer's software,
outweighed the compulsion to draw it as closely to the original as possible. Furthermore,
I chose an angle of 60ş for the rotation of the roller jewel during engagement with the
pallet fork. The original design called for 24ş, but increasing the angle also increases the
depth of the roller jewel inside the fork: by exaggerating the actions of the escapement,
the actions become more easily visible during the simulation. Other side effects of
increasing this angle from 24ş to 60ş are that the pallet fork becomes longer and the roller
jewel's circle radius becomes smaller by half. The depth increases by a factor of
three.
This example demonstrates how creating your own drawings would allow you to
change the variables and observe the consequences. The idea is not necessarily to create
the drawing as closely to the original specifications as possible, but rather to make
changes and to experiment. You may be able to improve a design or even invent an
all-original design.
Go to Table of Contents
Go to Escapements